Overview
As explained in the About Folders article, a folder is an essential building block of Samepage. It brings together a group of people (aka members) in several areas that are necessary for every project or team. You have to first create a folder, and then you can create your content and documents to collaborate and work with others.
There are two types of folders:
- Top level parent folders (under Workspace)
- Sub folders (inside top level parent Folders)
The folders function the same regardless if they are top level parent folders or sub folders.
Folders can have different access rights for members and guests. For more information about access rights please see the Assigning Access Rights in Folders article.
We recommend keeping your folder structure and access rights simple. Do not create a complicated folder/subfolder structure as it will make it difficult for users to navigate to the content that they need. For more information please see our Best Practices for Creating Folders.
For top level parent folders we recommend using the default access rights where all members of the organization are folder Managers. Or choosing the None option so the folder is not accessible to everyone, and then add in only the users who need to have access to that folder.
Create a top level parent folder
Only members of the organization can create top level parent folders.
To create a top level parent folder:
- Navigate to Workspace
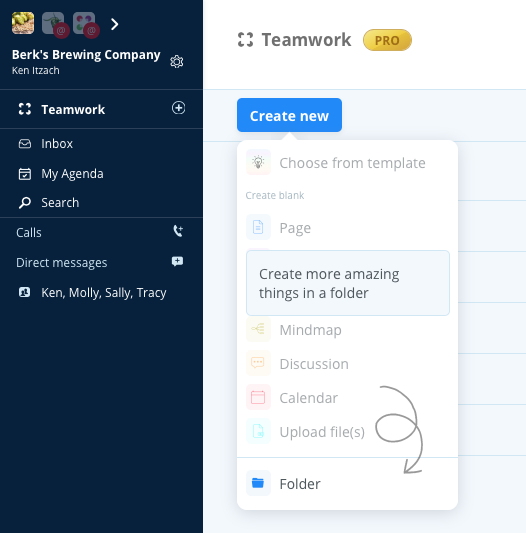
- Click Create new
- Select folder
- Name your folder
- By default all members of the organization are folder Managers but you can change this by clicking Change and modifying/adding access rights for specific users
- Click CREATE


Create a sub folder
Members and guests of the organization with Full Editor access rights can create sub folders.
To create a sub folder:
- Navigate to the top level parent folder where you want the sub folder to live and click to enter it
- Click Create new
- Select folder
- Name your folder
- By default access rights are copied to the sub folder but you can add access rights by clicking Change
- Click CREATE
More Information
As mentioned above be sure to check out the Assigning Access Rights in Folders article for more information about folder access rights.
Once your folder is created you can begin to build your content. Please see our Create a Document help article to get started.
To reorganize your folders please see our help article Copy, Move, Duplicate or Drag and Drop Documents and Folders.
To share your folder please see our help article Share a Folder.
